GD & T
Geometric dimensioning and tolerance is known as GD AND T. If you want to manufacturing a part with high precision this symbols is used. By the application and working method it will change. It actually describes the form, orientation, and location of various features on a part.
GD&T(Geometric dimensioning & Tolerancing) is a method or you can say standard of defining tolerances on engineering drawing. This standard is govened by AMERICAL SOCIETY OF MECHANICAL ENGINEERING. There are set of rules which are being accepted universally. This standard also set up a coding instructions between designer and manufacturer.
GD&T is the overarching language used in design, manufacturing and quality inspection. GD&T combines a set of symbols, rules and principles to ensure that everyone is on the same page regarding how a feature or part is defined. When a design engineer hands off a drawing to a machinist, they need a common technical language for communicating exactly what must be done. GD&T is a system to regulate and determine that communication.
GD & T Symbol (ASME/ISO)
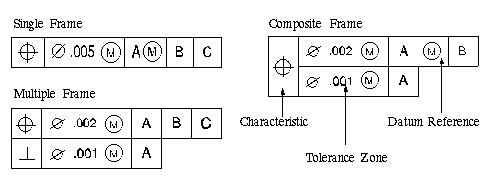
How to used it in drafting?Illustrated in below diagram.
Different types of feature control frame?
How is GD&T important in mechanical design?
Geometric Dimensioning and Tolerancing is essential in order to establish required controls on features. It also establishes relationship among features. GD&D ensures first time qualification of products. It is important due to the following factors are:-
1. Geometric Dimensioning and Tolerancing (GD&T) provides additional amount of tolerance value as compared with +/- or coordinate dimensioning method.Additional tolerance reduces manufacturing cost.
2. A functionally acceptable part may be rejected if +/- or coordinate dimensioning is adopted due to square or rectangular shape tolerance zone. A cylindrical hole feature may have its axis outside this tolerance zone. But it may be functionally acceptable. In spite of this, the part gets rejected.GD&T tolerance is based on functional aspect.Hence, usage of GD&T eliminates the chance of rejection of functionally acceptable parts.
3. GD&T provides Bonus tolerance due to the usage of MMC or LMC feature condition modifiers. It also provides bonus tolerance due to datum shift.
4. It helps to clearly communicate the design intent without any ambiguity.For example, information provided regarding datum on the drawing helps an inspector to establish datum without any ambiguity.
5. GD&T is a global standard.A part designed at one place may be manufactured and inspected at a place that offers cost effectiveness advantage without any compromise on quality of the product.Hence GD&T helps to utilize advantages of globalization.
6. GD&T considers functionality and interchangeability aspects.Hence it eliminates rework. Interchangeability also avoids craftsmen oriented custom fit assembly.
7. As GD&T encourages interchangeability of parts,concepts like Just In Time (JIT) may be used. JIT eliminates inventory related problems.
8. GD&T encourages usage of symbols and establishes effective communication channel.
9. GD&T offers manufacturing flexibility due to the usage of modifiers like MMC. For example,unused size tolerance may be used as bonus tolerance by using MMC modifier as feature condition modifier in the feature control frame.
10. GD&T reduces thermal and structural failures by controlling features as per the requirement .
It improves reliability of the system.


